

Installing a shower screen on your bath can transform your bathroom into a more functional and aesthetic space. Shower screens, also known as bath enclosures or bath screens, prevent water from spilling out of the bathing area while you shower. This keeps the rest of your bathroom dry and free of puddles, allowing you to use the space better. Plus, a shower screen gives your bathroom a neater, more modern look.

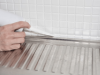
Fitting a shower screen onto a bath is a straightforward DIY project for most homeowners. The process involves carefully measuring your bath area, selecting an appropriate screen to match those measurements, and then installing the screen using either screws or adhesive. Most shower screens come packed with comprehensive installation guidelines to follow. As long as you have some DIY experience and the right tools on hand, installing a shower screen for bath can be completed in an afternoon.
With some careful prep work and patience during the installation process, adding a shower screen can take your bath from basic to beautiful. The rewards are well worth the effort!
Types of Shower Screens for Baths
When selecting a bath shower screen, you’ll find there are a few main styles to consider. Each has their own pros and cons to weigh up depending on your bathroom space and needs.
Frameless Bath Shower Screens
The most contemporary design option, frameless shower screens feature glass panels with metal brackets rather than full metal framing. This creates a sleek, seamless look and makes screens easier to clean without edges for grime to build up on. However, frameless screens typically come with a higher price tag.
Pivot Shower Screens for Baths
Pivot shower screens have hinges allowing them to swing open and closed. This adjustable style is perfect if you have a small bathroom and need to maximize space. It allows easy access in and out of the bath while containing water spray when closed. Just be sure to have enough clear space for the screen to swing fully when it is open.
Fixed Panel Bath Shower Screens
As their name suggests, fixed panels stay permanently in place as a sturdy screen option. They offer stability but zero flexibility or moveability, so they only suit larger bathrooms. Fixed panels tend to be the most affordable shower screen choice too.
Sliding Shower Screens
Sliding screens retract back and forth on tracks or rails. This space-saving option is ideal for narrow baths where a swinging pivot mechanism wouldn’t work. Sliding screens keep a slim footprint and create an adaptable showering space.
Curved Bath Shower Screens
Custom shaped for corner bathtubs, curved shower screens provide wraparound coverage with handy walk-in access. The curved form factor hugs the natural shape of a corner tub for comfortable and ergonomic showering. This specialized style suits small corner bath spaces beautifully.
Tools and Materials Needed to Fit a Shower Screen on a Bath
Installing a bath shower screen is a straightforward DIY job if you gather the right tools and materials ahead of time. Essential tools include:
· Power drill & drill bits: For drilling into tile and walls to install wall plugs and mounts
· Spirit level: Ensuring you mount the screen straight and plumb
· Silicone sealant: Waterproofing all joints
· Measuring tape: Taking precise measurements of your bath area
· Screwdrivers: Tightening screw fixings in place
In addition to your shower screen kit itself, you’ll need:
· Brackets, fixings & wall plugs: To mount the frame firmly on your walls
· Waterproof tape: Provides a protective seal behind frames prior to silicone
· Screws: Choose corrosion-resistant for damp areas
For safe working, be sure to grab:
· Protective goggles: Guarding eyes from debris when drilling
· Gloves: For handling glass panels and metal framing to prevent cuts
With the proper DIY equipment on hand, fitting a bath shower screen requires no specialist skills – just your own enthusiasm to enhance your bathroom.

Preparing to Install a Bath Shower Screen
Careful preparation is key to smoothly fitting your new bath shower screen. Start by measuring your bath and surrounding floor area very precisely, noting down the length, width, and height measurements. Account for any pipes or windows intruding into the space as well. These measurements will ensure you purchase a correctly sized screen.
Thoroughly clean the bath surface using a non-abrasive cleaner, removing any residue. Check around the rim to ensure your bath top is completely level. Having a level surface allows for watertight sealing of the screen once fitted. Mark out drilling points in pencil directly on your wall tiles or boards based on the mounting brackets in your screen kit.
Check what wall material you’ll be drilling into – tiles, plasterboard etc. – and use wall plugs compatible with the weight and thickness. For heavy glass screens, solid wall anchors rated for stone/tile provide the most secure base, preventing loose fixings over time. With measurements noted and drilling spots mapped out, your bath area is prepped for shower screen installation success!
Step-by-Step Guide: How to Fit a Shower Screen on a Bath
Installing your own bath shower screen is an achievable DIY project that can give your bathroom a sleek facelift. With the right tools and some patience, you’ll reap the rewards of a more functional tub and stylish living space. This step-by-step on how to fit a shower screen on bath can help you learn the steps in detail.
Step 1 - Getting Started
Work in good lighting conditions so you can see details clearly. Have your screen kit, tools, and materials close at hand before beginning. Ensure no electric cords can get wet and turn off any heated towel rails or radiators temporarily while working around damp sealant and adhesives.
Step 2 - Mounting the Fixed Panel
The fixed panel forms the anchored side of the screen that attaches directly to your wall. Apply the provided filler strips if there are small gaps between your wall and bath rims to create a flush surface for mounting. Hold the fixed panel in place against the wall, levelled horizontally by your spirit level checker. Mark the pre-drilled bracket holes with a pencil before setting this aside.
Drill into these marks using a masonry bit if drilling into tile or stone wall material. For lighter plasterboard walls, a general-purpose wood bit will suffice. Insert wall plugs level into the holes if needed then reposition the fixed panel. Screw the mounting brackets into place ensuring the panel remains completely vertical. Do not fully tighten yet.
Step 3 - Installing the Pivot Panel
Now move onto the second panel, referred to as the “pivot panel” since this side will swing open on hinges or pivot seals. Ensure any bottom seals are properly aligned in their grooves before placing this panel. Have an assistant hold the free edge while you insert screws into the top and bottom brackets loosely.
Check around the panels checking for alignment and even gaps before tightening any fixings completely. Wipe away any pencil marks visible through the glass using a soft cloth. Open and close the screen a few times, ensuring smooth operation without catching or rubbing. Tighten the brackets further if any wobble or instability occurs.
Step 4 - Sealing the Shower Screen
Mix a batch of bathroom-grade silicone sealant, following packaging directions to activate bonding agents before application. Run a steady bead of sealant along the interior gaps between wall and screen panels as well as along the bath rim edges. Use a disposable stick or plastic spatula to neatly smooth the sealant into any crevices and divots for a watertight seal.
Avoid smearing sealant over the clear glass visible areas to keep a clean finish. Allow several hours minimum for sealant to fully cure before use according to dry times indicated. Keep the screen lightly closed without latching to avoid shifted alignment while drying.
Step 5 - Adding Final Touches
Your pivot shower screen is structurally installed, but adding a few finishing touches creates a complete bath enclosure. Install end caps into open screw holes for a clean appearance. Wipe down the door panels and frame with a microfiber cloth, removing any adhesive residue or debris from installation.
Consider applying water-repellent treatment to glass surfaces which simplifies cleaning and prevents mineral build up over time. Finally, run a clear silicone bead along the outside base of the screen where it meets tile floors. This prevents any drips or splashes from escaping beneath the frame. Celebrate your gorgeous new bath with shower screen!
Troubleshooting Problems
Though problems are rare with proper installation, here are some quick fixes:
· Loose Frame
Tighten wall bracket screws if the frame wobbles but avoid over-tightening to prevent cracking tile.
· Leaking Joints
Ensure adequate silicone sealant fills any gaps the screens meet walls. Apply an additional sealant bead if necessary.
· Sticking Hinges
Clean out hinge joints and lightly lubricate with non-stick spray to regain smooth pivot motion.
· Difficult to Close
Check the bath rim is level. Affix self-adhesive bumpers to bay rims to prevent glass catching edges when closing.
· Condensation Build Up
Improve bathroom ventilation to control humidity levels. Wipe screens dry after use to prevent dripping and limescale.
With a few handy troubleshooting tips, you can keep your bath shower screen functioning flawlessly for years of everyday enjoyment!

Sealing and Waterproofing Your Bath Shower Screen
A key step when fitting any shower screen is properly sealing it to form a waterproof barrier. This prevents leaks which can cause extensive water damage in your home over time. Bathroom-grade silicone is the best sealant choice as it remains permanently flexible and resistant to mould and mildew.
When installing the screen, apply silicone generously along any perimeter edges meeting walls and along the bath rim. Using a plastic spreader or popsicle stick, smooth the sealant into a neat finish. Take care not to smear excess onto the glass. Allow several hours for the silicone to fully cure before using the shower.
Check the sealant yearly as part of routine bathroom maintenance. If any cracks, peeling corners, or thinning strips are visible, clean away old silicone residue entirely. Apply fresh sealant in affected spots to revitalize the waterproofing barrier. Well-sealed screens prevent leaks and also improve heat retention when showering, keeping your bath area cozy. Investing a few minutes into top-quality sealing protects your bathroom from damage and maintains the stylish finish.
Maintaining Your Bath with Shower Screen
Caring for your new bath shower screen helps preserve its sleek look and waterproof integrity over time. For cleaning glass panels, mix equal parts white vinegar and water for an effective limescale-busting solution safe for glass. Spritz onto screens after showering, allow you to soak briefly then wipe away mineral residue with a soft microfiber cloth.
For pivot shower screens, lubricate the hinge joints 2-3 times per year with a non-greasy spray lubricant. This prevents noisy or sticky operation when opening and closing the enclosure. Inspect the silicone sealant beads around the base and perimeter every few months, smoothing down or replacing any cracked areas immediately to prevent leaks.
Check wall brackets and screw fastenings to ensure they remain tightly anchored. Tighten or replace loose fixings right away to prevent detached panels or unstable doors. By cleaning shower screens diligently after use, lubricating moving parts, and examining seals and brackets annually, you can take full advantage of your bath shower screen for many years while avoiding expensive leaks or other damage.
Conclusion
Installing a bath with shower screen delivers practical water containment plus an elegant, contemporary aesthetic for your bathroom. By following secure installation techniques and properly sealing screens, you'll enjoy hassle-free showering for years on end. Don't forget regular maintenance like hinge lubrication and sealant checks to maximize longevity.
When you're ready to transform your bath into a sleek and functional space, visit Elegant Showers UK Online Shop. With an expansive catalogue of bath screens and professional custom services, Elegant Showers makes realizing your dream bathroom beautiful, easy and affordable.


Validate your login